
If you are going to use Incogniton, you will of course need to create a browser profile. A browser profile is unique with its own fingerprints – this prevents multiple browser profiles from being linked to each other. In this guide we will explain how to create a new unique virtual browser profile and get started in Incogniton.
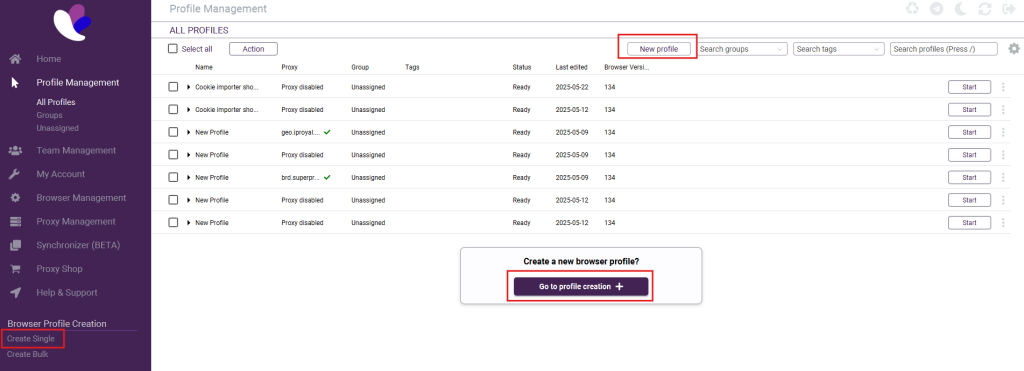
Step 1: When you are in the Incogniton overview, click on the Create Single button down left or the New profile button up right.
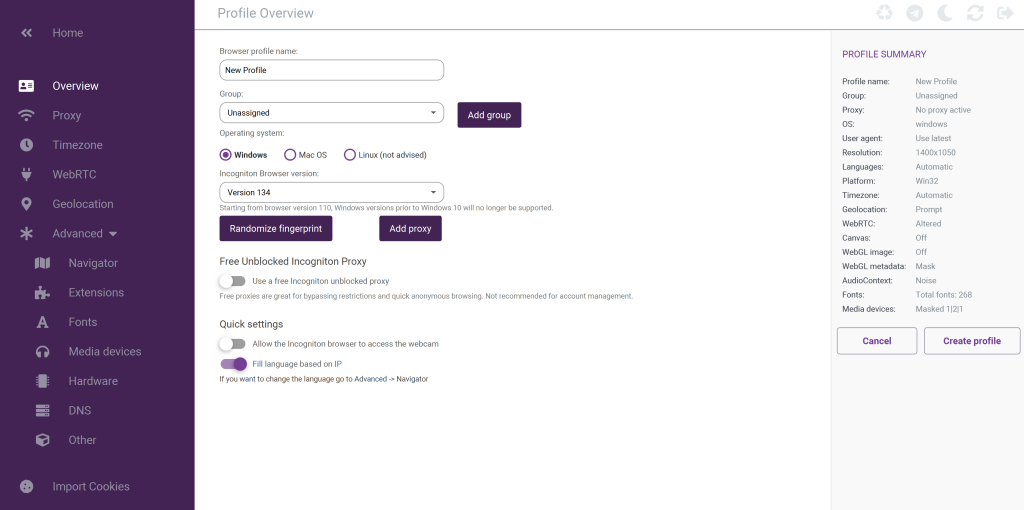
Step 2: After this, the overview page of the new browser profile will appear. On this page you can add the name, group, operating system, and the browser version of the Incogniton browser you want to use. We recommend that you always use the most recent browser version. If you would like to, you can also hit the button Randomize fingerprint. This means the hardware configuration and navigator settings of the browser profile will randomly change.
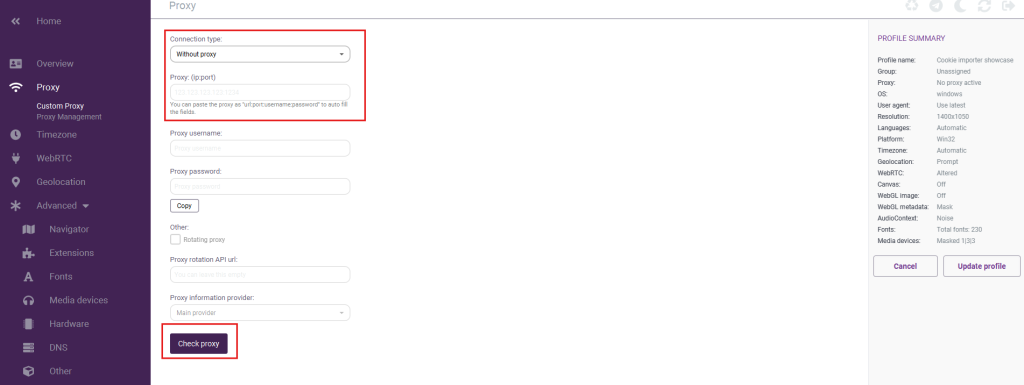
Step 3: Afterwards, navigate to the proxy settings by clicking on Proxy in the left-side menu. Enter the required details, including the connection type and the proxy details provided by your proxy seller. If you want to learn more about proxy connections we recommend you to read this article.
Step 4: Once you have completed the above steps, click on Create profile on the left and your browser profile is ready to use.
Advanced settings
It’s possible to customize the settings of you’re browser profile. Please note that it is not necessary to configure this because these settings are already filled in by Incogniton based on the proxy information and the automatically generated fingerprint. However, if you’re not satisfied with the standard configuration, you can customize the browser fingerprint configuration yourself:
- Timezone: Automatically filled in based on the proxy information, but you can choose a different timezone yourself.
- WebRTC: The WebRTC setting prevents your browser from bypassing your proxy to leak your legit IP address. It’s automatically set to Altered. If you want you can change this to Real then your real IP will be used for WebRTC. You can also turn off WebRTC or use the WebRTC from the proxy.
- Geolocation: This setting can be used to change your Geolocation – it is usually filled in based on the proxy details. However, if you want to you can customize this yourself.
- Navigator: With this setting you can change the navigator settings of a browser profile. Please read this guide on how to do this.
- Extensions: This setting allows you to add webstore extensions or custom extensions to your browser profile.
- Font masking: You can decide whether you want to enable or disable font masking in this tab. It’s default setting is for it to be enabled.
- Media devices: On this tab you can alter the media device configuration of the browser profile. Please note, if you want to use your camera in an Incogniton browser profile you need to turn media device masking off.
- Hardware: On this tab you can configure canvas masking, AudioContext and WebGL settings.
- DNS: On this tab you can configure a custom DNS (Domain Name System), it’s regularly disabled.
- Other: On this tab you can configure the following settings:
- Active session lock: If you want to prevent that your browser profile can be opened at multiple devices at the same time you need to enable this setting. This will prevent syncing errors of browser profiles.
- Show profile name in browser: With this the name of the browser profile is visible in the URL bar. When you have a lot of browser profiles opened at the same time it will be easier to select the right browser profile
- Use the navigator language for the browser language: With this enabled the navigator settings from the tab Navigator will be used for the browser profile. However, you can also decide to disable this and then the navigator settings of your actual device will be used.
- Add custom Chrome arguments: When you enable this you can add custom chrome arguments.
- Allow the Incogniton browser to access the webcam: This setting enables websites to use the webcam.
- Try to pass Iphey.com check: This setting will force Incogniton to disable or change certain features which will help with passing the iphey.com legitimacy check.
- Do not show Chrome settings: This means the chrome settings will be hided in your browser profile.
If you still have any questions about how to configure your Incogniton browser profile, please don’t hesitate to contact our support department!


